
Controlling a Track with Automation
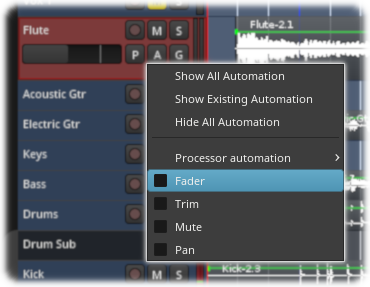
To automate a parameter on a given track, click on the track's A button and select a parameter to control from the menu that appears. Once a parameter has been selected, an automation lane for that parameter will appear beneath the track. The lane thus shown will be empty; from here an automation curve must be defined.
If the height of the automation lane is too small to see all of its controls, the height can be increased by Left clicking on the bottom border of the lane and dragging it.
There are three ways to define an automation curve:
- Record it using Write mode
- Record it using Touch mode
- Draw it using the mouse
Recording an Automation Curve Using Write Mode
To create an automation curve using Write mode, first set the lane's mode selector to Write, then set the playhead to the position where the automation curve should start, then set the transport to play. While the playhead is moving, Ardour will continuously record any changes made with the lane's fader. Even if no changes are made to the fader, they will overwrite anything that existed in the lane where the playhead is moving. When the desired automation curve has been recorded, stop the transport.
After the transport is stopped, the lane's mode selector will automatically switch to Touch mode—it is generally a bad idea to leave an automation lane in Write mode, as it is a destructive operation that makes it easy to inadvertently overwrite existing automation curves.
Recording an Automation Curve Using Touch Mode
Creating an automation curve using Touch mode is similar to the method employed in creating one using Write mode; the only difference is that changes are written to the automation curve only when the lane's fader is moved—at all other times, whatever was in the automation curve will remain as it was.
Touch mode is useful when only small parts of the automation curve need touching up versus Write mode, which is usually used to create the automation curve in the first place.
Drawing an Automation Curve Using the Mouse
In Draw mode, control points can be entered in the automation lane by Left-clicking in the lane at a point where there is no existing control point.
Once added, a control point can be Left-clicked and dragged to a desired location. Hovering over a control point will show its current level in dB. To remove a control point, Left-click it and press Delete, or Right-click on it.
Controlling the Track
Once an automation curve has been defined through any of the methods outlined above, the track won't do anything with it until the lane that the curve was defined in is set to Play mode. Then, during playback, as the playhead moves through the automation curve, the lane's control will move in accord with the curve.
The lane's fader will not be responsive to manual input while it is in Play mode.